3

How to create an HDR (high dynamic range) image with Photoshop and Photomatix Pro

Posted by Happy Hippo on 12/30/2009 01:14:00 pm

An HDR is an image that has a lot more colours than a standard picture, sometimes these colours are not even distinguished by our eyes, but with that much colour information, it is possible to create cool effects by mapping those colours to a colourspace that our eyes can see and the screen monitors can display. It can also be used when taking a picture of scenery that has areas too dark and too bright to capture in a single shot,  HDR software will basically take balancely exposed dark areas from overexposed photos and balancely exposed light areas from underexposed photos and merge them together. The latter does not require special colour manipulations after, just plain software image merging.
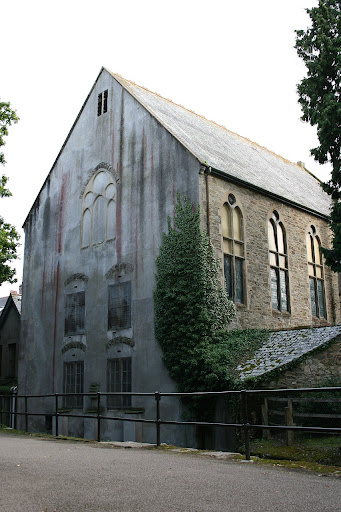
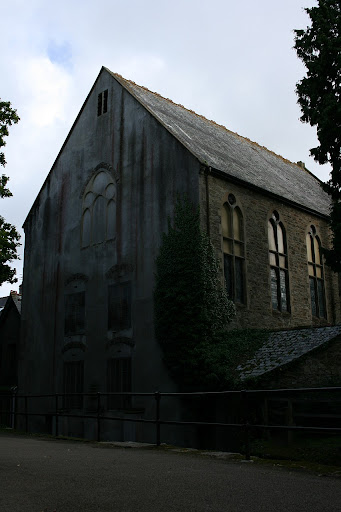
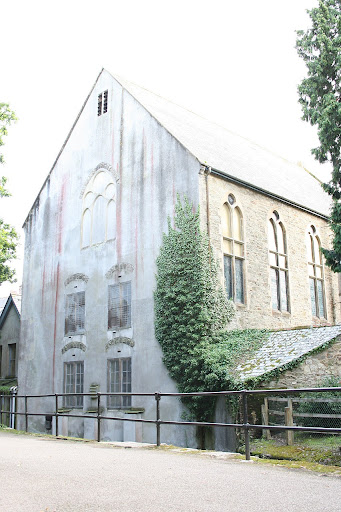
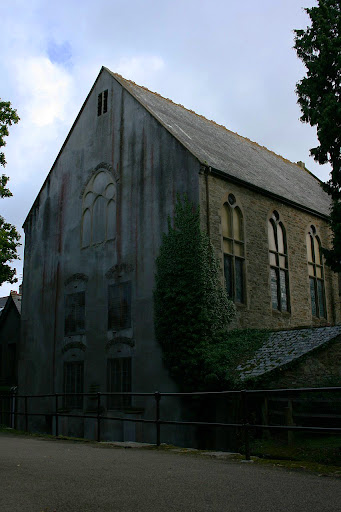
Here are some examples of HDR mapped images that I took. You will be surprised how boring the source  images are:


Making an HDR consists of two major parts:

Taking photos:
 
First of all, to get a very high colour range, you need at least three photos of the same object at different exposures. Usually -2 stops, 0 stop, and +2 stop. Of course other setting are widely used (e.g. -0.5, 0, +0.5,  -1, 0, +1) and more than 3 photos (-2, -1, 0, +1, +2) etc.. But the minimum is always three. This can sometimes prove difficult, because you have to keep you camera perfectly still for all 3 shots, so you need to consider a lot of factors like: wind, mirror movement, camera shake when you press the shutter button, the depth of field change when using different apertures, maybe quickly moving clouds ... There is a little cheat however: many cameras nowadays have AEB: auto exposure bracketing. If you enable this setting, it automatically changes the exposure for the next 3 shots (varies on different cameras, can be 6 shots in F0.5 steps, etc). So, for example, on my Canon 400D, all I do is, set AEB to -2, 0, +2 (in the Camera Menu, first tab), then set the camera to "timer mode", adjust shutter speed and aperture for desired Depth of Field (I also found fast shutter speed a more favourable setting), fix the camera on a tripod and press the shutter button. The camera takes 3 shots one after another, at -2, 0 , +2 stops. This obviously is the quickest way to take 3 shots, which minimizes effects from wind, movement, etc..
Alternatively, if your camera does not have AEB, just take a photo at normal exposure, then very carefully change the camera setting to underexposed and take a picture and do same for overexposed setting. Take a photoshoot with many sets of 3 photos and download those pictures to your computer. Now the major part is done :)
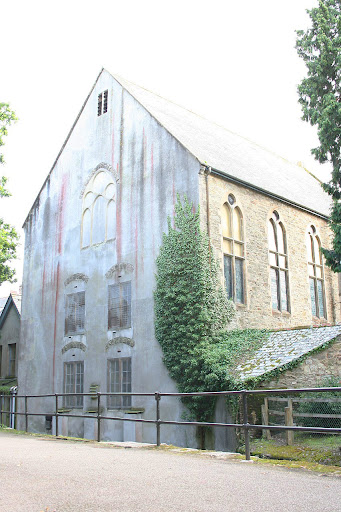
As an example, below are three images that I took as using AEB(notice that the first photo has washed out sky, second photo has better looking sky, and the third has balancely exposed small house on the very left side of the photo):


HDR example 1      HDR example2     HDR example 3

Processing photos with software to create an HDR:

Update: Photoshop CS5 now has HDR image toning and much better HDR controls, so the "grudge" effect is not needed anymore. 


The second part of creating a good looking HDR image is to merge the three photos above into one, which will have high dynamic range colour information. Photoshop is a very popular photo editor and it can be used to do this. Usually, I create HDRs with exhaggerated colours, looking unrealistic, but cool (see the slidewhow), but with Photoshop it's quite tricky to create such HDRs (possible but takes a while), compared to other HDR generating software (which will be described later). Nevertheless, I'll describe some commonly used setting when using Photoshop to form an HDR. Using the above images as an example, when Photoshop merges images into an HDR it only takes e.g. blue skies from the underexposed picture, tree clours from the overexposed picture etc... And colour manipulations are done to already formed HDR and of course this can be used on any image, not just HDRs. So what I usually do in Photoshop is open all images in Photoshop, then increase each image saturation slightly (depends how you like it) by going to Image > Adjustments > Hue/Saturation... and then I increase the conrast in each image (e.g. for this example I want the sky in the second picture to have more contrast) by going to Image > Adjustments > Curves... and changing the diagonal line to a very well known "S-curve" (or inverse S-curve for the sky, select one or another to increase the contrast)

Photoshop Saturation       Photoshop curves
The resulting images look a bit more promising(save them somewhere on your hard drive):


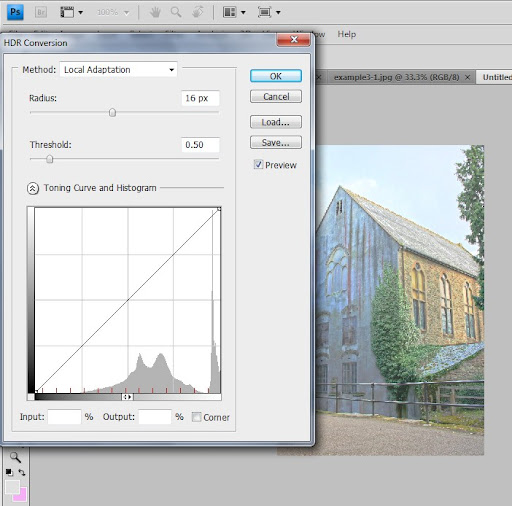
Now go to File>Automate>Merge to HDR... Then select your files (either unmodified files on your hard drive or click "Add open files") and click ok.


Then you will be shown a new preview of your new HDR. This Photoshop feature doesn't do any cool effects, it just basically takes the highest colour information from each picture, e.g. it takes blue skies from the underexposed picture and so on. Set the white point preview, until the detail you interested on the picture is balancely exposed (I aimed for slightly bluer skies) and then click ok. Note: in some situations this manipulation on its own is very useful, as it brought together blue skies (which were very washed out) and dark building (which was very underexposed together). If this is what you aiming for, you just need to convert this image to 16bit one; read below about conversion)

The image has 32bit colour depth, i.e. millions of colour tones per pixel is stored, but most displays can't even output those shades, so we need to convert this image to what it is in standard 16 bit colour depth. To do that go to Image>Mode>16bit/Channel...


A new windows will pop-up asking how you want to do the conversion from 32bit to 16bit, the most commonly used one is Local Adaptation, so select it from the drop-down list. The picture preview will suddenly start to look very different, move the bottom left slider of the diagonal line to the very bottom point of the histogram (grey curved area) and the top-right end of the line a bit down until you get naturally looking contrast in that image (there are of course other ways to convert the image, it's best to play around with this setting and select the one that you like, you can create new point on the line and drag them up or down).

32bit to 16bit conversion     HDR

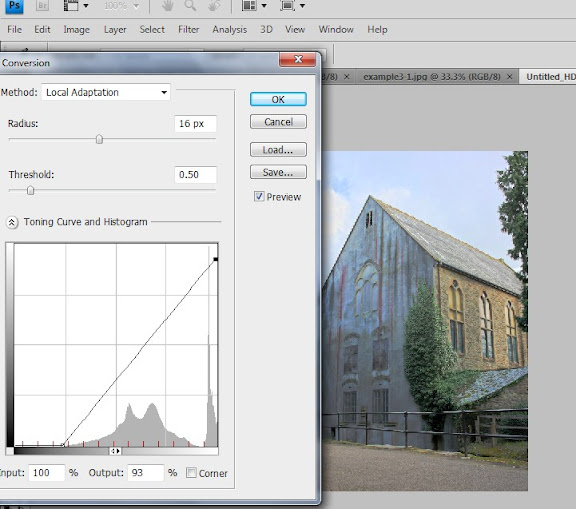
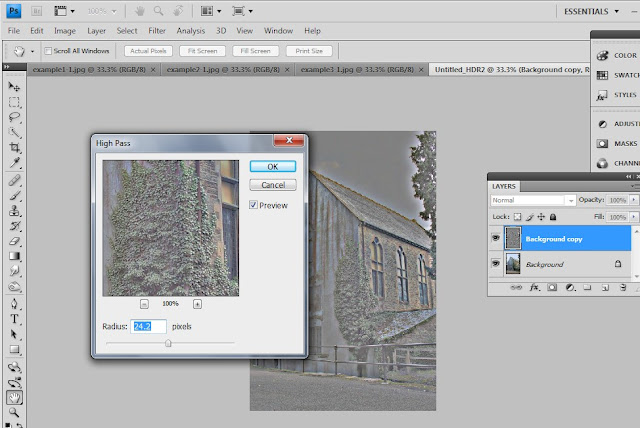
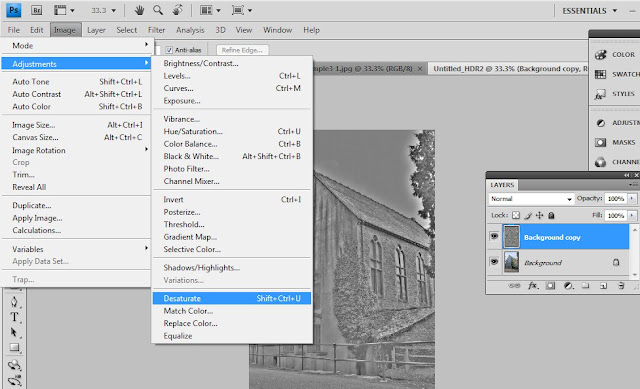
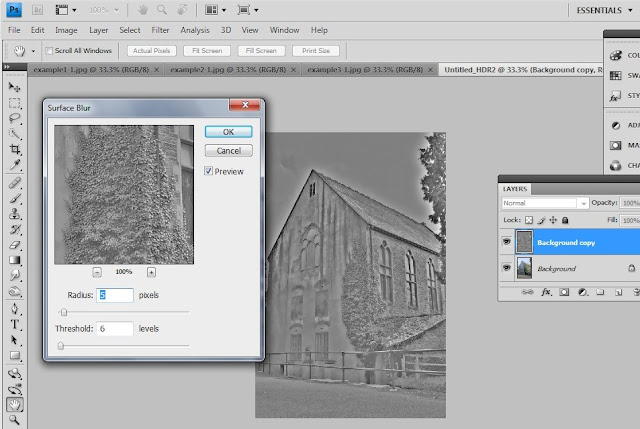
The resulting image starts to look a bit better now, similar to the one I have in the slideshow above. At this point HDR creation is now finished. The following is just standard Photoshop image manipulation: now I want to apply Grudge Effect to this HDR, by doing the following: go to Layer > Duplicate layer >  click ok to create a copy of your background layer, go to Filter > Other > High Pass Filter. Then, Image > Adjustments > Desaturate , then Filter > Blur > Surface Blur (can be omitted sometimes) and set the blending mode in layers palette to Overlay (or try other blending modes) and also change the opacity to about 80% or whichever looks good.

          
The final image created with Photoshop is this:


Of course there is almost unlimited variety of other effect that can be applied in Photoshop to achieve even better results. It's best to play around with settings until you achieve something that looks nice.


Other HDR software
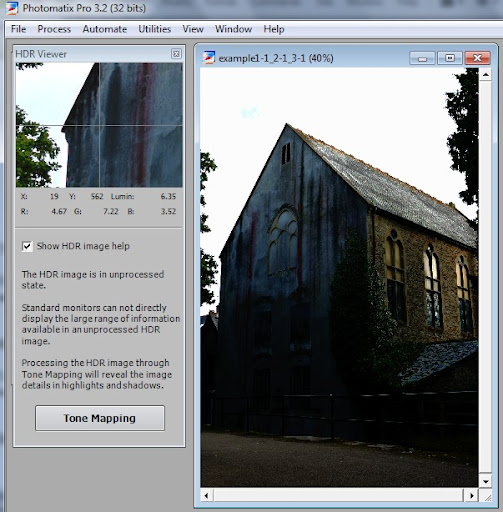
I think currently, Photomatix Pro is the most popular software that allows to create HDRs, as you have seen, with Photoshop it takes a while to create colour-enhanced HDRs, but with Photomatix Pro is can be done almost in seconds . When you start the program, a list of options appear, click Generate HDR image, a short wizzard will appear with the following dialogs:

Photomatix      
When you click ok in the last dialog, a preview is generated, which generally doesn't look very good, so click Tone mapping to access a rich set of setting and in particular a drop-down list at the bottom on the left side, that has a couple of presets. I usually select the Grudge preset and then modify the setting from there.

   
The final image that was generated with Photomatix Pro looks like this:


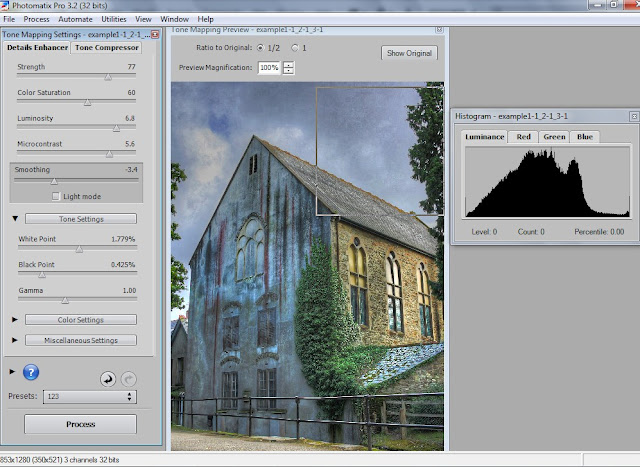
Which I find a little bit better looking than the one generated with Photoshop. I'll tell you the truth as well, all the images in the slideshow above were generated with Photomatix, because it's just time saving :)


HDR Cheating
There is a small cheat if you want to create an HDR. If you take a picture in RAW format, you can process it at different exposures later on a computer, creating, over-, norma-l, and under- exposed images. And then processing them with either Photoshop or Photomatix, and the result will look a lot like an HDR, although not as good as it would have been if you used three separate images. But in some situations, this is the only option really, if you are using slow shutter speeds, or have wind or other quickly changing scenery.


This concludes what I wanted to say about HDRs. If you have any questions, comments, or want to share a link to your HDR image or website, leave a comment with them, I will reply asap.

Marco Manzini Landscape and Nature Photography
Thanks for reading and Happy New Year!!
p.s. It's not actually needed to have symmetric aperture settings, you can have -1 0 +2 if you wish and able do it practically without shaking your camera. Other settings like shutter speed or ISO need not be the same, you just basically need one dark, one bright and one normal picture.

1

Beginner's guide to photoraphy

Posted by Happy Hippo on 12/18/2009 12:55:00 am
Every photographer must know the things that I list below, and understand what they do and what kind of effect they produce when changed to particular values:
  • The Shutter speed: this is the time that the camera sensor is exposed to light. So, if you set slow shutter speed, the sensor will be exposed to light for longer time than if you set it to fast shutter speed. Fast shutter speed is usually used for fast-moving objects, because in a very short time interval, that object is almost stationary (like a snapshot), and it comes out sharp and clear. Slow shutter speed is used when you want to achieve motion blur on a stationary background: e.g. a light trail/shadow of a moving car on a stationary background of a city or "ghost" shadows, or other creative techniques like light drawing. On Canon 400D this is done by going to manual mode and then rotating the wheel near the shutter button. Common shutter speeds are: 1/800 (one 8 hundreds of a second: very fast) is used for sports/racing, 1/200 is used for general photography/macro, 1/50 is used for portraits sometimes, 1/10 (slow) is used to get some motion blur, 1 second is used to get even more motion blur, 20/unlimited seconds is often used for light painting.

  • The Aperture or F-stop:  this setting allows you to set the size of the hole in the lens, allowing more or less light to go through to the sensor. Obviously bigger aperture (but lower F-stop) makes it possible to use faster shutter speeds (because less time is needed to properly expose the sensor to light) and vice-versa for smaller aperture. But this setting has another effect, called the depth of field (see below). Again, bigger aperture makes the depth of field more shallow, and smaller aperture makes it greater. Common values of this are: F22: very small aperture, needs very long exposure time (very slow shutter) and is used in e.g. light drawing; F12:small aperture, also needs slow shutter speed, but can be used for bright situations, F8, F6, F4.5, F4: very common general shooting apertures, require standard shutter speeds, and F4 is usually the maximum aperture on budget lenses; F2.8: is a very big aperture lens, these lenses are usually very expensive, but allow very fast shutter speeds/low light photography.
  • The Depth of Field:  this is not actually a setting, but more an effect you can easily change (and you need to think what kind of depth of field you want when taking any picture). As I mentioned before, this is achieved by varying the aperture and conversely the shutter speed (shutter speed is just to achieve the correct exposure, but the DOP is mostly set by the aperture setting). Some cameras (e.g. Canon 400D has a button that shows DOF preview)
  • Sensor sensitivity or ISO:  this setting let's you change the sensor sensitivity, and therefore adjust it for bright/low light situations. ISO of 100 is a common lowest sensitivity setting, that needs longest shutter speed for proper exposure (or/and higher aperture), it's good for day-light photos. Other common ISO settings are 200, 400, 800, 1600. That last one obviously is the most sensitive, low-light oriented setting. But generally you should aim for the lowest ISO possible, because the higher the sensitivity, the more noise you get. Noise is multi-coloured dot's on you image.

  • Colour balance:  your camera takes analog visible light and maps it to a digital representation of colours (i.e. from infinite variety of analog colours to a map of many millions of colours, also know as a colour space). But how obviously different screens or printers display colours differently, so this setting allows you to slightly vary the colours of this colourspace, to match your device. Automatic setting usually gives good results, but sometimes you can set it to other custom values if you think it doesn't look very natural, e.g.: 7000k setting is used when you have a lot of shadow, 3200k , slightly bluish tint.. etc (it usually says in the camera manual).
  • The light-meter, exposure:  every DSLR camera has a light-meter that you can see if you look through the view-finder or on the LCD screen before taking a picture. It usually is just a line with a small indicator. For balanced exposure you want the indicator to be exactly in the middle. Otherwise if the indicator it shifted to the right, you'll get overexposed images and vice versa if it's to the left. In manual mode, you just change the aperture and shutter speed, until the indicator goes to the middle, you cannon move the indicator itself. But in semi-automatic modes on Canon cameras (e.g. 400D), the indicator in always in the middle, because all other setting are selected automatically to make it stay there, but, if you don't like it and want your image darker or brighter, but still stay in semi-automatic mode, you can set "Exposure compensation" setting, by moving the indicator to the left or right (see your manual).
Marco Manzini Landscape and Nature Photography
  • Lens focal length: I have already mentioned in my previous posts what types of lenses exits (in 1.6x format): 7-12mm: fisheye lenses, that give distorter images but extremely wide angle, 12-24mm: wide angle lenses, 24-70mm: standard lenses (no magnification), 70-500mm: telephoto lenses, dedicated macro lenses. It's quite easy to use lenses once you have them, especially with autofocus and multiple focus, but a word of caution: when using macro lenses or 100-500mm lenses, you definitely need a tripod, because every small hand movement adds a lot of blur, the higher the magnification, the bigger the effect. And also, maximum lens aperture decreases when you increase the focal length, so you need to be aware of that.
Next I will be publishing slightly more advanced techniques, which require proper understanding of what I wrote above.
If you have any questions, leave a comment. Thanks.
Happy Hippo

    4

    Canon 400D overview and accessories guide

    Posted by Happy Hippo on 12/15/2009 02:19:00 am

    I wrote a guide how to choose a digital camera that is right for you in this article. My choice was an APS-type digital SLR camera: Canon 400D, and I want to describe my experience when working with it.
    First of all, the manual that comes with this camera is very handy, not only it has all the instructions how to operate the camera, but also basic photography explanations and tips.
    Manufacturer specifications can be found here, but it's a very long list, so I'll put the main specifications only:

    • APS-C sensor (22.2 x 14.8mm), click here for explanation of different sensors.
    • 10 Megapixels 
    • 1.6x focal length multiplier 
    • 9 point auto-focusing system
    • 2.5" LCD screen
    • Compact-flash memory card 
    • RAW format
    • 3 frames per second continuous shooting
    • Built-in sensor cleaning system
    • ISO range: 100-1600
    • 6 auto-modes, 3 semi-auto modes, 1manual mode
    • 10 seconds timer, and built-in infrared receiver for wireless remotes
    • auto/custom white balance 
    • Auto Exposure Bracketing (AEB) in 3 steps (useful for High-Dynamic Range or HDR pictures)
    • shutter speed range: 1/4000s - 30s/unlimited (and 1/200 min when using built-in flash)
    • rechargeable Lithium-ion batteries (charger is included)
    • PC-sync lead

    Canon 400D is considered to be a budget camera, when it was first released it cost around 400 pounds ( or  $750) for the body &18-55mm lens, now it can be bought for about 330 pounds or even less on ebay or used. Of course with many newer models available, you may consider buying something else, but don't forget, that accessories play a huge role for photographers, while personally I find that many new "features" are completely useless, for example cameras with more than 10 megapixels resolution, unless you want to print larger than A3 (or crop a lot), new models that have larger LCD screens with "live preview" feature that allows to see the picture on the LCD screen before you take it: first, it's useless in bright sunlight, and second the LCD screen "eats" so much battery power, if you keep looking at it, your battery will be exhausted in no-time etc ( a longer list of important and not-important features/specifications is here in the table at the bottom of the page). And so investing in e.g. second lens or more accessories rather than in features that you'll never use sounds like a reasonable thing to do.
    Canon 400D feels quite light, is not heavy to carry around, it's easy to use and it produces very good quality pictures. But as with every DSLR, you need to know a bit more about photography, because you have a lot more control how you want to take your picture.

    It's quite easy to learn basic photography jargon and acquire necessary skills to take good picture (which I intend to publish shortly), and it is also quite easy to remember how to set those settings in the camera. I will not write how to do it here, because it is very well described in the manual.

    An extremely long and thorough review of Canon 400D with sample pictures can be found here.

    Now I'm going to write a list of accessories that you might want to consider, this is particularly useful for people doing maybe A-level courseworks and stuff, because almost every one of these accessories gives you a lot of photography techniques to explore and describe in your sketchbook. 

    Other accessories that I bought over the years were:
    • 70-300mm Sigma APO Macro lens. I actually bought a cheap lens on ebay that had exactly the same specifications for £50, but it turned out to be an old film-SLR lens, and because Sigma reverse engineer Canon lenses, their older lenses became incompatible when new Canon Digital SLRs were released (although most older film SLR Canon lenses are still compatible with Digital SLRs). But the seller on ebay refused to refund the money , so I phoned Sigma and they offered to trade it for £128, so it cost me £178 to get this lens, which is a bit more than if I just bought it at a shop. So, if you decide to buy on ebay, be very careful with what you buy. But it's a good lens, it gives about 12x magnification on 300mm and also macro can be useful, although it's not a dedicated macro lens. In general you may consider other lenses: for example: (1) 18-200mm general lens, which is useful because it gives you both wide angle lens and telephoto lens in one, so you don't have to waste time changing lenses if you go from one scenery to another. (2) Dedicated macro lenses: give beautiful pictures of plants/insects.. etc (3) Wide-angle lenses 12-24mm are used for landscape photography, interiors etc (4) Fish-eye lenses, 7-12mm , these lenses give a lot of distortion to the picture (making it spherical), but can also give very artistic effect and a lot of detail in a picture (5) Fast lenses: lenses with F-stop(aperture) of F2.8, they are usually very expensive , but allow to use fast shutter speeds, and very shallow depth of field, i.e. blurred background (resulting in "professional looking photos") for portraits etc
    • Macro Extension tubes (£5): the cheap version does not have any electrical connections to the lens, so you loose autofocus ability, but with these tubes on, you can go a lot closer to your object. And for macro, autofocus is not the most important element. Alternatively you can get a lot more expensive extension tubes (about £60) which will make your lens a macro lens, keeping autofocus functionality and aperture controls.

    • A tripod is a must-have accessory for any photographer, you'll need it for macro, portraits, general shots, slow-shutter speed, HDRs light-painting etc. I went for a cheap (£10), light and portable tripod, because my Canon 400D is not very heavy, so this tripod is just fine for me. But if you have a very heavy lens, or camera, you may need a more professional (and expensive tripod).
    • A bag, you'll need a bag, once you start getting different equipment for your camera, the best DSLR bags I've seen so far are made by LowePro. I went for Lowepro Slingshot 100AW on ebay that costs around £30. But it has padded walls that protect the camera and lenses, microfiber LCD protector, lost of different partitions for memory cards etc, and all-weather cover to protect against rain, snow etc.

    • Spare batteries: the original Canon battery that comes with 400D is 720mAh capacity, and again, brand new Canon batteries cost a lot, but on ebay I bought two 1300mAh batteries (high capacity) from Hong Kong for 7 pounds, and they have been working fine for over 2 years now. I usually use up two batteries during a photoshoot (there is also an accessory called battery grip, which is attached to the bottom of your camera and is simply a container for three batteries, so there is no need to replace them, also gives shutter button at the bottom the the camera).

    • Spare memory cards, if you plan to experiment with RAW format or want to take loads of picture at a time, you might need to consider buying a spare compact flash memory card, I would recommend at least 2Gb high speed memory card (e.g. Sandisk extreme III CF 2gb ), they are quite cheap on play.com. You need a high speed memory card, because if you do continuous shooting (e.g. 3 frames per second), than you camera will stop after a few shots and you'll have to wait until this shots are written to the memory card, but with a fast memory card that is not a problem (but it will stop anyway briefly after about 27 shots).

    • Flash-gun, I only bought this recently, but I found that it's a must-have accessory, because it gives a lot better results than if you use a built-in flash.  I went for a budget flash gun as well, but I did a lot of research  and chose Jessops 360AFD for Canon. It's quite a powerful flashgun and has a lot of useful features, like a built-in diffuser, focus-assistant light, swivel, rotate, manual controls, e-ttl technology etc. There were some articles that claimed it has 30 recycle time, which is nonsense. It can fire two times almost instantaneously, and then recycle in 2-5 seconds. (50pounds on ebay)


    •  Filters : these are circular pieces of glass, that can be attached to the front of the lens and give it some useful or artistic properties. Filters vary in size, according to the lens aperture (which is displayed on the front of the lens, e.g. Ѳ58, or Ѳ55..). You can read about different types of filters on the internet, but I bought some neutral density filters and a circular polarizer filter on ebay. I used the former to increase the F-stop of my lens and so to make very slow shutter possible for light-painting, and the latter was used to get rid of water reflection, which is really fun. Other quite nice filters exist that give a lot of creativity for your camera: (1) Skylight filters: increase the contrast of the sky (2) infra-red filters: allow to take pictures of infra-red light together with visible light, if used properly this can give very nice effects (3) UV (ultraviolet) filter: remove UV light, which results in glare , etc, but this doesn't really do much, so it is often used to protect the more expensive lenses.

    •  Camera armor: this is used to protect the camera from light damage, scratches, in particular the LCD screen. But also, I bought a silver Canon 400D, so later I realized it doesn't look very professional, so it also helps to hide unprofessional silver colour :)( the armor also comes in red colour). Costs around £30 (but it accumulates dust over time unfortunately)
    • remote control: I went for a cheap remote control on ebay, which works fine. And it's very useful for macro, or shots that require very steady camera hold. Canon 400D remotes usually have two buttons: 2 seconds delay and normal shutter button.


      Marco Manzini Landscape and Nature Photography
    • lens cleaning kit, you need a special cleaning kit for the lenses, if you don't want to damage them. Even a cheap microfiber cloth and  lens cleaning liquid will do the job.

     So as you can see, over a few years, accessories/equipment turned out to cost more than the camera itself, and I went for budget solutions all the time. But without them I think my photography experience would have been quite limited. It's true that any DSLR camera gives a lot of settings and effects to play with, but combined with proper accessories, this can produce very professionally looking pictures and unlimited creativity.


      If you have any questions about the camera or accessories listed, just leave a comment, and I'll reply asap.
      Thanks
      Happy Hippo

      1

      Windows 7 64 bit review / guide (tested on a tablet PC and Desktop PC)

      Posted by Happy Hippo on 10/06/2009 04:31:00 pm

      64 bit vs 32 bit

      Windows 7 is a new operating system from Microsoft that seems to be getting very good reviews and after testing it for about two months now, I like it A LOT, even though I installed a 64 bit version (64bit Windows Vista caused a lot of driver compatibility issues, but it's no longer a problem because most manufacturer's have released drivers for 64 Windows Vista, which are compatible with windows 7 64bit). If you don't know the difference between 32bit and 64bit versions, here is the list of advantages and disadvantages of one over another:


      • 64bit operating systems support more than 4 Gigabytes of memory (RAM), while 32bit operating systems "see" only up to 4Gb of RAM. So, for example, if you have 6Gb memory on your Computer, you will need a 64bit operating systems to use it all.
      • 64bit operating systems address RAM in a different way to 32bit operating systems, and basically saving you up to 0.5Gb of RAM. For example, if you have 4Gb of memory and windows XP 32bit, it will "eat" 0.5Gb of memory for its own use (to store DLLs in memory , etc) and show that you have only 3.5Gb of RAM.
      • 64bit systems work faster, especially if you work with large files. For example,as bigger chunks of large files can be mapped in RAM, and it also improves number crunching programs.

      Installation:

      I was very happy about the way the installation went, very clear instructions on what to do, a bit faster than Windows Vista (maybe because I was installing 64 bit version of Windows 7). And I was surprised to see that every single driver was properly installed with most available functions (although later on I installed the manufacturers driver software for better functionality).
      Also, I recommend to buy a 4Gb USB stick and copy the contents of your Windows 7 DVD on it (just select all files on the DVD and copy them to the USB stick), and wow! you have a USB-copy of windows 7 , which I successfully installed on my laptop (that doesn't have a DVD driver and it installed even faster from a USB stick).
      Screenshots and  Virtual Machine installation instructions can be found here.


      Interface:

      The main interface change that I noticed is obviously the taskbar:


      As you see, they combined the quick launch area with the main taskbar area, making it slightly higher and if you open an application, only its icon is displayed there, if the application is minimised the application icon stands out, so you always know what is open and what is just a shortcut in the taskbar.

      The start menu is almost identical to Windows Vista.

      When you roll over one of those open applications in the taskbar,  it shows a small thumbnail of what that application is doing and if you hover over that thumbnail, all other windows become transparent, and you can see what you application is doing in real time, without minimising the rest of your open windows.


      Windows explorer was changed a bit by adding: "libraries" and "recent places" shortcuts, which  are quite similar to iTunes interface, Libraries contain your files, which you can access from any explorer window and you can create new libraries. And recent places changes all the time depending which folder you accessed recently, so you don't have to look for it again.


      Network connectivity and device management has also been improved: for example, if you want to connect to a wireless network:click Internet access icon in system tray, find your wireless network and click connect:


      New "Devices and Printers" shortcut in the control panel shows every device you have connected to your system and lets you change it's properties (and all of that out-of-the box, without downloading drivers).


      In this operating system, for the first time, Microsoft has added a few backgrounds, system sounds, themes, colour customisations etc.. which makes it look a lot better than other Microsoft operating systems out-of-the-box, they even added an option to play a slideshow of pictures on your desktop or video.


      Sidebar gadgets can now be placed anywhere on your desktop, and there is not actual sidebar anymore, just small gadgets.


      Media:

      The sound system and video drivers were automatically and correctly installed on windows 7, the volume control and "playback/recording devices" is very similar to Windows Vista.
      Windows Media player was changed a bit: it now has libraries as well, and better playlist management.


      It can be changed to "skin mode" by clicking the small button in the lower right-hand side corner.

      Similar to Windows Vista, Windows Media player can play photos and videos.


      Also, windows media player may be controlled from taskbar pop-up window, when you hover over WMP ison.


      Stability and reliability:

      Since installing this version of windows, I have experienced a few problems, in particular: blue screens when installing some older applications: like old versions of shrew VPN, NCP vpn, some drivers, incompatible fingerprint software, blue screens when using windows built-in VPN.. but they were caused because those applications were NOT designed for windows 7, nowadays I have all of those installed without problems, because a lot of updated applications for windows 7 have been released already. But anyway, I'm actually glad they didn't work, because I had a chance to try windows 7 backup/restore features.


      First of all, Windows Backup feature is extremely useful, it saves copies of your documents and many other files at specific time intervals (usually every day), so if you accidently delete something and empty the recycle bin, you can always restore a previous version of your files/folders (I know this is an old feature in Windows, but it's still worth mentioning):


      I have also used Windows System Restore application numerous time to: fix bluescreen problems with incompatible drivers, to completely remove non-working applications, to remove of some settings I changed etc... And I feel otherwise I would have had to reinstall windows 7 completely, so make sure you have this enabled, if you don't want to reinstall everything if something goes wrong. More about Windows 7 system restore can be found here.

      Security:

      Windows 7 is based on Windows Vista, so the security is quite similar : User Account Control feature (which I disabled as I find it annoying), Windows Defender: basic anyspyware program, Windows Firewall: basic firewall solution, Windows Automatic Updates, Security Centre: notifies about possible security threats/weaknesses. Microsoft has also released a free antivirus called: Microsoft Security Essentials, which is now available for download, I have not tried it, but it's better to have an anti-virus on any system (also read about other useful programs here).

      Tablet PC functionality:

      A lot of users have tablet PCs nowadays or some sort of digital pen that is used to draw or write on the screen. Personally I use a tablet pc to record all lecture notes, and Windows 7 is extremely useful at this: it has built in handwriting recognition and many applications like Microsoft Office can use this, as well as improved touch-screen functionality.


      Conclusion:  I will definitely upgrade to Windows 7, but not going to spend huge amount of money for it. Better wait for some sort of sale or student offer, or maybe free upgrade offers, which some manufacturers do nowadays.

      If you have a question about this Windows 7 operating system, just leave a comment, and I reply asap. Thanks

      A list of useful links if you want to know more about Windows 7:

      © All content on this site is copyright, except where other sources are specified. Please contact me before using any resources on this blog in any way ©